![]()
Blog Subjects
Subjects make it easier for site visitors scanning a blog page find posts that interest them. Here’s how they work.
1. An author assigns one or more subjects to a blog post.
2. When the post is published, a list of subjects assigned to all posts appears in the right column.
3. A site visitor clicks a subject to see all related posts.
For example, a blog’s subjects are Visual Arts, Music, and Poetry. A user creates a new blog post about his favorite band, Ektronica, and assigns the subject music subject to the post. When a site visitor views the blog page, he looks under Subjects and clicks Music. A list of music-related posts appears, including the one about Ektronica.
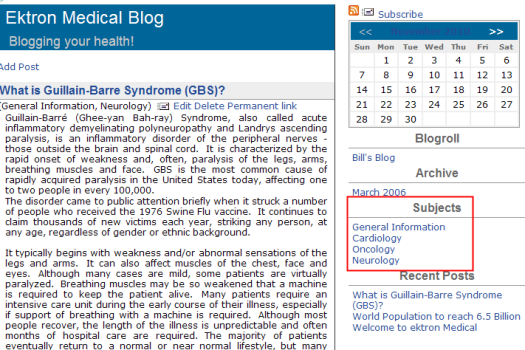
Subjects are surrounded by a rectangle in the following figure.
A subject can only be assigned to the blog in which it is created -- it cannot be reused with other blogs. With each new blog, you must create new subjects. This gives you the flexibility to tailor unique subjects to each blog.
How Blog Subjects Appear on your Web Site
By default, a blog's subjects appear with other blog components when a Blog Server control is placed on a Web page. A developer can place a list of blog subjects only on a Web page via the BlogCategories Server Control.
Adding Blog Subjects
To add a blog subject, follow these steps.
Note: To add a blog subject from the Web site, you must be logged in.
1. In the Workarea, navigate to the blog folder.
or
From the Web site
- open the menu for the blog.
- click Properties.
2. Choose View > Properties.
3. Click Edit Properties ( ).
).
4. Click the Subjects tab, then Add Subject.
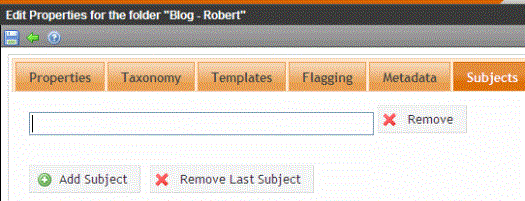
5. A text box appears.
6. Enter the subject.
Note: Add as many subjects as you need by clicking Add New Subjects.
7. Click Save ( ).
).
Editing Blog Subjects
To edit a blog subject, follow these steps.
Note: To edit a blog subject from the Web site, you must be logged in.
1. In the Workarea, navigate to the blog folder.
or
From the Web site
- open the menu for the blog.
- click Properties.
2. Choose View > Properties.
3. Click Edit Properties ().
4. Click the Subjects tab.
5. Change the information in the text box for the subject you want to edit.View > Properties
6. Click Save ().
Note: You can edit several subjects before clicking Save.
Removing Blog Subjects
There are two ways to remove blog subjects.
Removing the Last Blog Subject
Each task is explained below.
Removing the Last Blog Subject
Follow these steps to remove the last blog subject on the page.
Note: To remove a blog subject from the Web site, you must be logged in.
1. In the Workarea, navigate to the blog folder.
or
From the Web site
- open the menu for the blog.
- click Properties.
2. Choose View > Properties.
3. Click Edit Properties ().
4. Click the Subjects tab.
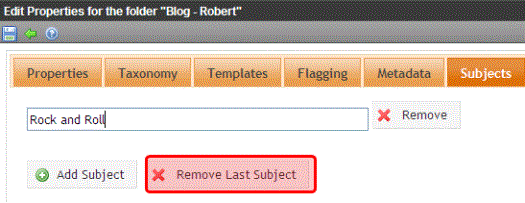
5. Click Remove Last Subject.
6. A dialog box appears.
7. Click OK to remove the last subject.
Note: You can continue to remove subjects at the end of the list by clicking the Remove Last Subject link.
8. Click Save ().
Removing any Blog Subject
Note: To remove a blog subject from the Web site, you must be logged in.
1. In the Workarea, navigate to the blog folder.
or
From the Web site
- open the menu for the blog.
- click Properties.
2. Choose View > Properties.
3. Click Edit Properties ().
4. Click the Subjects tab.
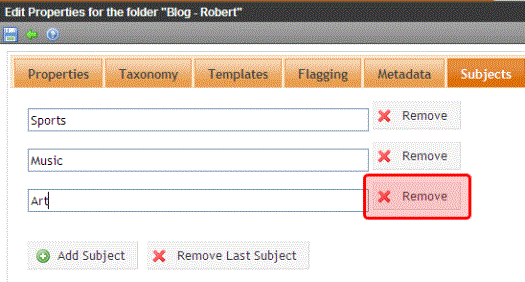
5. Click Remove next to the subject to be removed.
6. A confirmation box appears.
7. Click OK if you want to remove the subject.
Note: You can continue to remove subjects from the list by clicking Remove next to each subject.
8. Click Save ().


![]()